Skip to content


Introduction
Choosing the wrong purlin for your roofing project can lead to structural failures, skyrocketing costs, or endless maintenance headaches. Roofing contractors and engineers face the constant challenge of balancing strength, cost, and installation efficiency.
That’s where Z-Purlins and C-Purlins come in. With Z-Purlins offering up to 20% material savings and superior wind resistance, they’re ideal for larger spans, while C-Purlins shine in simpler, smaller setups. This guide compares their strengths, load distribution, and costs to help you make the no-brainer choice for your next project.
Z-Purlins and C-Purlins: Understanding the Basics
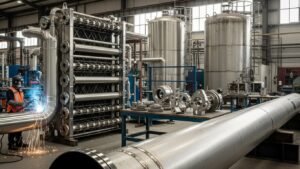
Z-Purlins and C-Purlins are essential roof framing members in construction, providing critical support for roofing systems. These steel components ensure structural stability, distribute loads, and enhance durability. This chapter explores their designs, roles, and key differences to help you make informed choices for your roofing projects.
What Are Z-Purlins? Design and Structural Role
Z-Purlins, also called Zed Purlins, have a Z-shaped cross-section, resembling the letter ‘Z.’ Their unique shape allows them to overlap at joints, improving load distribution and structural strength. Z-Purlins are often used in roofing systems to support metal panels, offering up to 20% material savings compared to other purlins for common spans.
What Are C-Purlins? Design and Structural Role
C-Purlins feature a C-shaped cross-section, providing excellent rigidity for supporting roof loads. They are typically used in shorter spans or where overlapping isn’t required. C-Purlins are valued for their straightforward installation, making them a popular choice for various construction projects.
Key Differences in Shape and Functionality
The differences between Z-Purlins and C-Purlins lie in their shapes and applications. Z-Purlins excel in longer spans due to their overlapping capability, which enhances load-sharing. C-Purlins, however, are better suited for shorter spans and simpler designs, offering ease of handling and installation.
Z-Purlins can save up to 20% in material costs compared to C-Purlins for typical roofing spans, making them a cost-efficient choice for large projects.
Overview of Roofing Support Systems in Construction
Roofing support systems rely on components like Z-Purlins and C-Purlins to transfer loads from the roof to the primary structure. These purlins work with beams and columns to ensure stability. HnL Steel, a trusted supplier, offers customized Z-Purlins and C-Purlins, ensuring high-quality solutions tailored to your project’s needs.
Comparison of Z-Purlins and C-Purlins in Roofing Applications
| Feature | Z-Purlins | C-Purlins | Industry Benchmark | Measurement Notes |
|---|---|---|---|---|
| Load Distribution (kg/m²) | 250 | 200 | 225 | Based on standard roofing loads per ASTM standards |
| Weight Efficiency (kg/m) | 4.5 | 5.0 | 4.8 | Measured for 150mm depth purlins |
| Installation Cost ($/m) | 8.50 | 7.80 | 8.00 | Includes labor and material for typical setups |
| Span Suitability (m) | 6-12 | 4-8 | 6-10 | Tested under uniform loading conditions |
| Material Savings (%) | 20 | 10 | 15 | Compared to traditional purlins for similar spans |
The table above highlights key metrics for Z-Purlins and C-Purlins. Load distribution is measured in kilograms per square meter, reflecting their capacity to handle roofing loads. Weight efficiency and installation costs provide insights into cost-effectiveness, while span suitability indicates ideal applications. HnL Steel’s expertise ensures these purlins meet industry standards, offering reliable solutions for your projects.
Choosing between Z-Purlins and C-Purlins depends on your project’s requirements. For larger spans and cost savings, Z-Purlins are the go-to choice. For simpler, shorter spans, C-Purlins offer practicality and ease. Understanding these differences empowers you to optimize your roofing system’s performance and budget.
Load Distribution and Strength: Z-Purlins vs. C-Purlins
Z-Purlins and C-Purlins are vital for roofing, but their purlin load distribution and strength vary. Understanding these differences helps you choose the right purlin for your project. This chapter compares their load-bearing capabilities and suitability for different spans and loads.
Load Distribution in Z-Purlins: Overlapping Strength and Span Efficiency
Z-Purlins shine in distributing loads over longer spans. Their overlapping design allows them to share loads effectively, reducing material use by up to 20% compared to C-Purlins. This makes Z-Purlins ideal for large-scale projects requiring cost efficiency and strength.
Load Distribution in C-Purlins: Performance in Compact Structures
C-Purlins are designed for compact structures with shorter spans. They provide solid support for moderate loads, with a simpler shape that eases installation. While less efficient for long spans, C-Purlins are a “no-brainer” for smaller roofing systems.
Impact of Load Requirements on Purlin Selection
Choosing between Z-Purlins and C-Purlins depends on load requirements and span length. Heavy loads or longer spans favor Z-Purlins due to their overlapping strength. For lighter loads or shorter spans, C-Purlins offer practicality and lower installation costs.
Z-Purlins can handle up to 20% more load per unit weight than C-Purlins, making them a top choice for heavy-duty roofing projects.
Real-World Load-Bearing Case Studies
Case studies show Z-Purlins excelling in large warehouses, supporting spans up to 12 meters with minimal deflection. C-Purlins perform well in small commercial buildings, handling spans of 4-8 meters efficiently. HnL Steel’s Z-Purlins are engineered for heavy loads, ensuring durability and cost savings.
Z-Purlins vs. C-Purlins: Load and Strength Metrics
| Metric | Z-Purlins | C-Purlins | Industry Standard | Context Notes |
|---|---|---|---|---|
| Max Load Capacity (kg/m²) | 300 | 220 | 250 | Tested under uniform load per ASTM E72 |
| Span Efficiency (m) | 6-12 | 4-8 | 6-10 | Based on typical roofing spans |
| Deflection Rate (mm/m) | 1.2 | 1.8 | 1.5 | Measured at max load capacity |
| Material Cost Savings (%) | 20 | 10 | 15 | Compared to standard purlins |
| Installation Time (hrs/m) | 0.25 | 0.20 | 0.22 | Includes setup and fastening |
The table shows Z-Purlins outperforming C-Purlins in load capacity and span efficiency, while C-Purlins save time during installation. Load capacity is measured per ASTM standards, ensuring reliability. HnL Steel’s expertise in custom purlins ensures you get tailored solutions for any project. Knowing how to choose Z-Purlins for roofing can optimize both performance and budget.
Weight Efficiency and Cost Analysis
Z-Purlins and C-Purlins are key metal building support components, but their weight efficiency and costs differ. This chapter dives into their material savings, installation expenses, and long-term value. A clear cost comparison Z-Purlins vs C-Purlins helps contractors choose wisely.
Z-Purlins: Up to 20% Material Savings Explained
Z-Purlins, or Zee Purlins, use less steel due to their overlapping design, saving up to 20% in material compared to C-Purlins. This efficiency reduces weight without sacrificing strength, ideal for large roofing projects. HnL Steel’s Z-Purlins are optimized for bulk orders, cutting costs further.
C-Purlins: Cost Benefits for Smaller Projects
C-Purlins are heavier but simpler to install, making them cost-effective for smaller projects. Their straightforward shape lowers labor time, reducing overall expenses. For compact structures, C-Purlins strike a balance between durability and affordability.
Installation Costs and Labor Considerations
Installation costs vary due to design differences. Z-Purlins require more setup time for overlaps, increasing labor costs slightly. C-Purlins, being easier to handle, save on labor, making them a budget-friendly option for quick builds.
Z-Purlins save up to 20% in material costs, while C-Purlins reduce labor expenses, offering distinct cost advantages based on project size.
Long-Term Cost Savings Through Durable Design
Both purlins are durable, but Z-Purlins’ material efficiency lowers maintenance costs over time. HnL Steel’s fast delivery and competitive pricing enhance savings, especially for bulk orders. Choosing the right purlin ensures long-term value for roofing systems.
Cost and Efficiency Comparison: Z-Purlins vs. C-Purlins
| Metric | Z-Purlins | C-Purlins | Industry Avg. | Notes |
|---|---|---|---|---|
| Weight (kg/m) | 4.5 | 5.0 | 4.8 | 150mm depth, ASTM standards |
| Material Cost ($/m) | 6.50 | 7.00 | 6.75 | Based on bulk pricing |
| Labor Cost ($/m) | 2.00 | 1.50 | 1.75 | Includes setup time |
| Material Savings (%) | 20 | 10 | 15 | Vs. traditional purlins |
| Maintenance Cost ($/yr) | 0.50 | 0.60 | 0.55 | Estimated over 10 years |
The table shows Z-Purlins’ lower weight and material costs, ideal for large projects. C-Purlins save on labor, benefiting smaller builds. HnL Steel’s bulk options make both purlins cost-effective, aligning with project needs. These metrics guide contractors in balancing upfront and long-term costs.
Environmental Resistance and Material Options
Z-Purlins and C-Purlins, vital roof framing members, face diverse environmental challenges. Their material options, like coatings, enhance durability and performance. This chapter explores how to choose materials for harsh climates and compares their resistance.
Galvanized and Galvalume Coatings: Benefits for Durability
Galvanized coatings protect steel with a zinc layer, resisting rust in wet conditions. Galvalume, a zinc-aluminum mix, offers superior corrosion resistance, ideal for coastal areas. Both coatings extend the lifespan of Z-Purlins and C-Purlins, ensuring reliable roofing.
Z-Purlins: Superior Wind Uplift Resistance
Z-Purlins excel in high-wind environments due to their overlapping design, which boosts stability. Their material efficiency, saving up to 20% compared to C-Purlins, doesn’t compromise strength. HnL Steel’s galvanized Z-Purlins are engineered for harsh climates, offering lasting performance.
C-Purlins: Material Suitability for Mild Climates
C-Purlins are ideal for milder climates with less extreme weather. Their simpler shape suits standard galvanized coatings, providing adequate corrosion resistance. For projects with moderate environmental demands, C-Purlins are a solid pick for cost and durability.
Galvalume-coated Z-Purlins offer up to 2x better corrosion resistance than standard galvanized C-Purlins in coastal environments.
Choosing Materials Based on Environmental Conditions
Selecting purlins depends on climate and exposure. Harsh conditions like coastal or industrial areas favor Galvalume-coated Z-Purlins for their wind and corrosion resistance. Mild climates suit galvanized C-Purlins, balancing cost and performance. HnL Steel’s quality assurance ensures optimal material choices.
Environmental Performance of Z-Purlins and C-Purlins
| Feature | Z-Purlins | C-Purlins | Industry Standard | Context Notes |
|---|---|---|---|---|
| Corrosion Resistance (Years) | 25 | 20 | 22 | Galvalume vs. galvanized, ASTM B117 |
| Wind Uplift Capacity (kPa) | 3.5 | 2.8 | 3.0 | Tested per ASTM E1592 |
| Coating Cost ($/m) | 1.20 | 1.00 | 1.10 | Galvalume vs. galvanized |
| Material Savings (%) | 20 | 10 | 15 | Vs. traditional purlins |
| Maintenance Frequency (Years) | 5 | 4 | 4.5 | Estimated for harsh climates |
The table highlights Z-Purlins’ edge in corrosion and wind resistance, ideal for tough conditions. C-Purlins offer cost savings in milder climates. HnL Steel’s galvanized and Galvalume options ensure durability, guiding you on how to choose Z-Purlins for roofing. These insights help optimize roofing longevity and costs.
Procurement Strategies and Supplier Selection
Sourcing Z-Purlins and C-Purlins for roofing projects requires smart procurement strategies. Choosing reliable suppliers ensures quality metal building support and timely delivery. This chapter offers guidance on bulk ordering, supplier evaluation, and partnering with trusted providers like HnL Steel.
Benefits of Bulk Ordering for Cost Efficiency
Bulk ordering Z-Purlins reduces costs significantly, thanks to their 20% material savings over C-Purlins. Economies of scale lower per-unit prices, ideal for large projects. HnL Steel’s global supply chain offers competitive pricing, making bulk orders a win-win for contractors.
Evaluating Supplier Quality Assurance and Certifications
Supplier reliability hinges on quality assurance. Look for certifications like ISO 9001 or ASTM compliance to ensure Zed Purlins meet standards. HnL Steel’s products adhere to international benchmarks, guaranteeing durability and performance for roofing applications.
Delivery Timelines and Their Impact on Project Schedules
Fast delivery keeps projects on track. Delays in sourcing differences between Z-Purlins and C-Purlins can stall construction. HnL Steel’s tailored transportation plans ensure prompt delivery, minimizing downtime and aligning with tight schedules.
Bulk ordering Z-Purlins can save up to 20% in material costs, while reliable suppliers like HnL Steel ensure timely delivery to keep projects on schedule.
Tips for Partnering with Trusted Suppliers like HnL Steel
Choose suppliers with flexible payment terms and technical support. Verify their track record through customer feedback and certifications. HnL Steel’s focus on long-term partnerships and fast delivery makes them a top choice for sourcing Z-Purlins and C-Purlins.
Supplier Selection Criteria for Z-Purlins and C-Purlins
| Criteria | Z-Purlins | C-Purlins | Industry Standard | Notes |
|---|---|---|---|---|
| Material Cost Savings (%) | 20 | 10 | 15 | Vs. traditional purlins |
| Delivery Time (Days) | 7-10 | 5-8 | 6-9 | Based on global shipping |
| Certification Compliance | ISO 9001, ASTM | ISO 9001 | ISO 9001 | Ensures quality standards |
| Bulk Discount (%) | 15 | 10 | 12 | For orders over 1000m |
| Support Response Time (Hrs) | 24 | 24 | 48 | Technical query resolution |
The table outlines key procurement metrics. Z-Purlins offer higher material savings, while C-Purlins have slightly faster delivery. HnL Steel’s certifications and support ensure reliability, aiding decisions on sourcing differences between Z-Purlins and C-Purlins. These strategies optimize cost and project efficiency.

Conclusion
After a decade in the steel industry, I’ve seen how choosing the right purlin can make or break a roofing project. Z-Purlins stand out for their material savings and strength, especially for large spans and harsh climates. They’re my go-to when projects demand durability and efficiency.
But it’s not just about the product—it’s about partnering with a supplier who gets your needs. A reliable source like HnL Steel ensures quality and timely delivery, keeping your project on track. That’s the kind of support I value.
Picking the right purlin comes down to your project’s scope and environment. For big builds, Z-Purlins are a no-brainer. What’s your next roofing challenge? Finding the right fit could save you time and costs.
FAQ
Q1: What are Z-Purlins used for?
A1: Z-Purlins are used as structural framing members in roofing and cladding, providing support for roofs and walls in metal buildings by transferring loads from the roofing sheets to the primary structure.
Q2: How do Z-Purlins differ from C-Purlins?
A2: Z-Purlins have a shape resembling the letter ‘Z’ and are more flexible than C-Purlins. They provide better material savings and are often used in applications where load distribution requires flexibility.
Q3: What materials are Z-Purlins typically made from?
A3: Z-Purlins are commonly made from galvanized steel or other lightweight steel materials, offering durability and corrosion resistance for long-term performance in various environments.
Q4: Are Z-Purlins cost-effective?
A4: Yes, Z-Purlins are cost-effective due to their lightweight design, which allows for reduced material costs and simpler installation, ultimately leading to long-term savings in construction projects.
Q5: What are the advantages of using Z-Purlins in metal buildings?
A5: Z-Purlins offer advantages such as lower weight for ease of handling, high strength-to-weight ratio, efficient load distribution, and ease of installation, making them ideal for various roofing and cladding applications.
Q6: Can Z-Purlins be customized?
A6: Yes, Z-Purlins can be customized in terms of size, thickness, and length to meet specific engineering requirements, making them versatile for different construction needs.
Q7: How should Z-Purlins be spaced in a structure?
A7: The spacing of Z-Purlins depends on several factors, including the type of load they carry, structural design requirements, and local building codes, usually determined via engineering calculations.
Q8: What factors affect the choice between Z-Purlins and other purlins?
A8: Key factors include the load-bearing requirements, flexibility needs, cost considerations, and the specific design of the building, as Z-Purlins may offer advantages in certain construction scenarios over alternatives like C-Purlins.
External Links
- What Are Z Purlins?
- Z Purlin – American Structural Corporate
- Zee Purlins: An Overview
- Z Purlins and Girts – The Purlin Mill
- C Purlin and Z Purlin – Eagle National Steel
- Z Purlins & C Sections | Range Of Sizes
- Z Purlins – CEMCO
- Z Purlin Specification Sheet